Tag Archives: food

Chinese Cucumber Salad 黄 瓜

This simple cold salad is a fairly straightforward interpretation of the kind of side dish you are likely to be served in almost any Chinese restaurant in Beijing.  Cucumber Salad is sometimes cool and refreshing, and other times mind-blowingly spicy.  In some restaurants you’ll find extremely simple Cucumber Salads, some consisting simply of cucumber and vinegar.  At the next place you could be served something equally complicated.  My interpretation blends two of my favorite Chinese ingredients in a simple dressing that I learned to make while in Beijing. Enoy!

Close up of the finished salad. Photo by my sister, Sarah. Thanks!

Ingredients

  • 2 English Cucumbers
  • 2 Hot Red Peppers (fresh or dried, seeded & coarsely chopped)
  • 4 cloves Garlic (peeled & halved)
  • 1/4 cup Sesame Oil
  • 1/2 cup White Rice Vinegar
  • 1 tablespoon Sugar
  • 1/8 cup Pepper Flower Oil or Lucky Trio Oil(this ingredient is optional, but I highly recommend adding it)
  • 2 teaspoons Sesame Seeds
  • 1/2 cup Rehydrated Wood Ear Mushrooms
  • 1/2 cup chopped fresh Cilantro leaves

Directions

Start by mixing your dressing.  Combine the oils, vinegar, and sugar in a small bowl and whisk them until the sugar dissolves.  Give it a quick taste, and adjust it if necessary.  Add the garlic and chile peppers to the dressing and set it aside.  Next, chop the mushrooms into bite sized pieces and toss them into a large mixing bowl.  Chop the Cilantro leaves coarsely and add them to the bowl.  Now it’s time for your cucumbers.  Chop your cucumber into bite sized sticks, similar in shape to carrot sticks, but about half the length.  Toss them into the mixing bowl as well and mix them together with the mushrooms and cilantro.  Add the dressing (freshly whisked) and sesame seeds right before serving the salad.  Keep the dry salad cool and covered while you are waiting to serve it.

Leave a comment

Filed under Asian, Salads

Dumpling Night

My sister, Sarah held a small get together on Saturday night where I shared my “mad dumpling skills” with two of our girlfriends, Jessica, and Anne. There were a lot of laughs while we attempted to roll out wrappers and stuff our funny little dumplings. Sophia, my dumpling teacher from Beijing, would have been ROFL if she had seen our collection of ass dumplings. But despite their strange looks, our dumplings tasted pretty great. One of these days I’ll get the hang out of folding them correctly. Until then, I guess you could say that I specialize in the making of ass dumplings.

To go along with our pile of dumplings, I made up a quick Cucumber Salad, one of my favorite Chinese Salads. It is pretty simple, consisting mainly of chopped cucumber, a little rehydrated wood mushroom, a couple cloves of garlic, and a chile pepper. It’s dressed with Sesame Oil, Rice Vinegar, and a little sugar. Delicious! Sarah made a kickin’ side dish as well. She made up a plate full of Braised Baby Bok Choy that was out of this world. I wasn’t a huge fan of bok choy while I was in China, but Sarah’s version was very nicely done.

Here’s some photos that Sarah took from our little cooking adventure. Enjoy!

scissorina - View my 'Dumpling Night!' set on Flickriver

Leave a comment

Filed under stories

Chicken Tikka Masala, Sort Of

Tonight Scott and I made The Kitchen Bible’s Chicken Tikka Masala recipe that he found through Cookstr.com.  Had I taken a close look at the recipe initially, I probably would have realized that though it was pretty tasty, it wasn’t too authentic.  The final dish had a very acidic taste, probably from the boat load of lime juice involved in the sauce and marinade.  It was also lacking in the spice department.  It contained plenty of cilantro, some red chili, and a bit of turmeric and cumin.  A classic Garam Masala spice blend would have been a better choice.  Anyway, the final dish was pretty tasty, but hardly a knock-out, and not all that much like what I expect Chicken Tikka Masala to taste like.  Next time I try for Tikka Masala, I think I am going to try Pioneer Woman’s version, which came highly recommended by my littlest sis, Cait.

Marinade Ingredients

Marinade Before & After Puree

Marinating Chicken

Making the Sauce

Finished Dish: Chicken Tikka Masala

Leave a comment

Filed under Asian

Not Exactly Enchiladas

Tonight I cheated a bit and used a few canned/pre-made things to cook dinner with.  One was a can of Enchilada Sauce ala Old El Paso, another was a set of low carb wraps, and the last was a packet of Taco Seasoning. (Old El Paso strikes again!) What I made with it all was something that I would call, “not exactly enchiladas”.  Where classic enchiladas are extremely delicious, they are also extremely time consuming.  Today, I wasn’t into the whole six hour cooking thing, so this funny little Mexican casserole was born.

Ingredients

  • 4 Low Carb Wraps
  • 2 tbs. Olive Oil
  • 1 tsp. chopped Garlic
  • 1 lb. Lean Ground Turkey
  • 1 packet Taco Seasoning
  • 1 can Red Enchilada Sauce
  • 1 can black beans (rinsed and drained)
  • crap loads of shredded Sharp Cheddar Cheese

Ingredients!

Directions

Start out by slathering the bottom of your casserole dish with olive oil and chopped garlic.  Because I had made roasted garlic that morning, my olive oil was lucky enough to have garlic bathing in it all day.  Lucky, but not necessary.   Oh! This would be a good time to preheat your oven to 375.  Next, toss your ground turkey into a fry pan and let it cook up until it is nice and brown.  Add the beans, break up the meat, then add 2/3 cup of water. (Or whatever your taco seasoning calls for.) Pop in the taco seasoning, then stir the meat and beans over the hot burner until all of the water evaporates.  If you are addicted to spicy food, like I am, go ahead and sprinkle on some extra Cayenne Pepper.   A little mouth fire never hurt anyone.  Now remove the mixture from the heat and set it aside.

Next, pour half of the enchilada sauce into a wide, shallow bowl.  Dip one wrap into the sauce, coating it completely.  Now fill the wrap with as much of the meat and bean mixture as it can hold.  Fold it up like a burrito and place it into the casserole dish.  Repeat this with each of your wraps.  Ideally, you’ll use up all your meat, but if you don’t, don’t worry.  It will taste pretty ding dang good when you scoop it up in a spoon, smother it with shredded cheese, and pop it into your mouth.  (See? It pays to be the one cooking dinner.)  Speaking of shredded cheese, you’ll need it soon.  Pour the remaining enchilada sauce over the top of your little burritos and then smother the whole thing with shredded cheese.

Place the casserole into the oven and let it bake for about 20 minutes.  The whole thing should be bubbling and oozing in a very seductive way.  If your casserole is already golden and crispy on top, then take it out.  If it needs a little extra push, try broiling it for an additional 2 – 5 minutes.   After you’ve removed it from the oven you’ll want to dive right in, but it’s best to let it sit for a few minutes before you get into it.  Try serving it along with sour cream, Spanish rice, or guacamole.  A salad would be a great addition as well, since this casserole is a bit in the heavy side.

Leave a comment

Filed under Casseroles, mexican

My Favorite Chinese Stir Fry: Sliced Pork & Wood Ear Mushrooms

This was what I learned to cook during my second Chinese Cooking Class.  It incorporates ginger, garlic, and peppers, three elements that my teacher told me were necessary ingredients for almost all Chinese home cooking.  This dish is a basic stir fry that combines sliced pork in a simple marinade with fragrant wild pepper oil, savory wood ear mushrooms, dried lilies, and the cool crunch of fresh cucumber.  Served with rice or a cold salad, this makes an excellent main course.  Like many Chinese dishes  I have learned to make, this one takes a good deal of preparation, but with careful scheduling and about 30 minutes of prep the night before, you can pull off the main bulk of cooking in less than an hour.

Garlic, Ginger, and X'ian Peppers

Flower Pepper Oil

  • 2 cups Vegetable Oil
  • 2 tablespoons Flower Peppers

Stir Fry

  • 8 oz. to 1 lb. Lean Pork
  • 1 tablespoon Dark Soy Sauce
  • 2 teaspoons Cornstarch
  • 1 tablespoon Malt Vinegar
  • 1 Egg White
  • 1 cup Dried Wood Ear Mushrooms
  • 1 cup Dried Day Lily Buds
  • 1 Cucumber
  • 1 cup Flower Pepper Oil
  • 2-3 Eggs
  • 4 cloves Garlic
  • Fresh Ginger to taste
  • 2 – 5 Dried Hot Peppers, seeded and chopped into thirds (optional)

Goji Sesame Rice

  • 2 cups Steamed/Boiled Rice
  • 1 teaspoon Goji Berries
  • 1 teaspoon Raisins
  • 1 teaspoon Black Sesame Seeds

Phase One: Flower Pepper Oil and Rehydrating the Dried Ingredients

Flower Pepper Oil is a key ingredient in many Chinese dishes.  By infusing the spicy aroma and flavor of Flower Peppers into a simple base oil, such as Canola, Peanut, or Soybean, you can kick your stir fry dishes up a notch.  Pour at least 2 cups of oil into a wok, or deep skillet, followed by 2 tablespoons of dried Sichuan Flower Peppers.  Warm the oil over medium heat for 15 – 20 minutes, or until the pepper browns completely.  This process will fill your kitchen with the sweetly spicy aroma of Flower Peppers. Yum yum yum.  Remove the pan from heat and allow it to cool completely.  Once it is ready, strain the oil through a cheese cloth or fine mesh strainer to remove the Flower Peppers.  Keep the oil in a sealed bottle or container until it is used.

Infusing the Flower Pepper Oil

Wood Ear Mushrooms are also known as Brown Wood Fungus, Judas Ear Fungus, and Jelly Ear Fungus.  In your Asian grocery they may be called  木耳 mù ěr or 黑木耳 hēi mù ěr in Chinese or キクラゲ kikurage in Japanese. It is one of about a zillion edible mushrooms so be cafreful when you try to pick it out.  It looks like this.

Wood Ear Fungus and Dried Lilies

The yellow things on the right are Chinese Day Lily Buds.  They are called 金针菜 jīn​zhēn​cài​ in Chinese and are available at most Asian groceries.  If you have trouble finding them, take a simple approach and just ask for “dried lilies”.   Both the Wood Ear Mushrooms and the Lilies will need to be re-hydrated before they can be used.  This will take at least 30 minutes, so it’s not a bad idea to get this over with the night before if you know you’ll be short on time the next day.  Pop about 1 cup of each into bowls of cold, salted water and let them sit for 30 – 90 minutes.  Any less and they’ll remain dried out.  Any longer and they can begin to wilt.  When they have had enough to drink, drain them and set them aside, covered and refrigerated if you’re cooking them the next day.

Wood Ear Mushrooms and Day Lily Buds Re-hydrating in Salt Water

Phase Two: Prep Work

The first thing you’ll need to do is to slice and marinade the pork.  Start with a lean pork medallion and a very sharp knife.  Slice the pork as thinly as you can, and then chop the slices into bite sized pieces.  You can use between 8 ounces and 1 lb. for this recipe depending on the size of your crowd and your fondness for meat.  When the pork has been all cut up, toss it into a bowl followed by 1 tablespoon of Dark Soy Sauce, 1 tablespoon of Malt Vinegar, and 1 tablespoon Flower Pepper Oil.  This special soy sauce can be found at the Asian Grocery, but if you’d rather not add another odd bottle to your collection of household sauces, go ahead and use regular soy sauce.  It won’t affect the flavor all that much.  Add a little salt, an egg white, and a teaspoon of cornstarch.  Mix the marinade and pork well to make sure it is totally coated, then set it aside.

Large Slices of Ginger

Now comes the chopping.  In this dish, garlic and ginger play a major role.  You can go by your own taste on how much to add.  For me, I don’t hold back. I chop up about 4 – 6 cloves of garlic, and about 1/2 thumbs worth of fresh ginger when I cook this dish.  Peel the garlic and chop it into coarse, vertical pieces.  Shave the ginger, then slice it into large chunks.  These large cut chunks will add flavor, but are not meant to be bitten into during every bite of the meal.  As an added bonus, for those who don’t enjoy chomping into straight garlic or ginger, these large slices are easy to avoid.

Chunks of Garlic

Next, you’ll need to prep your re-hydrated ingredients.  Make sure your Mushrooms are totally drained, then carefully pull each one apart with your fingers, creating bite sized pieces from the giant individual mushrooms.  To prep the Lilies, pick them from the pile one at a time, and feel each end of the stalk.  If you feel a very hard nub at either end, chop it off and discard it.  You can leave the remainder of the lily whole, chop it in half, or even tie it in a knot if you want to get fancy.

Wood Mushrooms and Lily Buds Ready for Action

The cucumbers are next.  Get yourself a good sized English Cucumber, nice and long, but not too skinny.  Chop that sucker into 3 inch sections, discarding the round nubs on either side. Like so.
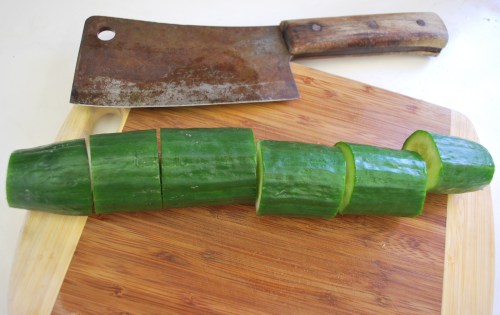
Chopping the Cucumber, Step One

Now, tip each section onto its flat side and cut it into 1/8 inch slices. Like this, and set them aside for later.

Chopping Cucumbers, Step Two

At some point it would be a great idea to throw on a pot of rice.  Long grain, basmati, whatever your pleasure, it’s best to have it steamed up, hot and ready when the dish is completed.  So get on it before you get cooking.  If you want to make your rice extra nutritious and delicious, not to mention extra interesting, toss in the following ingredients once the rice is finished cooking: 1 tablespoon Goji Berries, 1 tablespoon Raisins, and 1 Tablespoon Black Sesame Seeds.  Don’t these things look scrumptious together?  You know they do.

Goji Berries, Raisins, and Sesame Seeds, a Delightful Treat for Your Boring Rice.

What’s a Goji Berry you ask?  Sheesh.  If you must know, Goji Berries are small, red berries found throughout China, the Himalayas, and Tibet.  They grown on teeny little evergreen shrubs, and contain a boatload of goodies, such as antioxidants, beta-carotene, and the lesser known but very good for you cartenoid, zeaxanthin.  They are dried, and kind of look like pointy red raisins.  BTW, they are delicious in ramen.

Phase Three: Cooking!!

So you are finally ready to rock the wok.  Get the largest, most wok-like pan at your disposal and fill it with at least 1/2 cup of Flower Pepper Oil.  Heat that bad boy up over medium to high heat while you whisk together 2 – 3 eggs (depends on the size of your eggs, your appetite, and the amount of meat you’re using).  When the oil is hot, whisk the eggs like crazy to bubble them up, then drop them on in and watch the magic.  As a Westerner, the idea of deep frying scrambled eggs probably sounds completely crazy, but you’ll soon see the merit in this method.  Soon after your eggs hit the oil they will bloom into puffy delicious clouds.  Use a slotted spoon, or better yet, one of those round spatulas full of holes to nab the eggs out of the oil.  Once you’ve got them, drain them on a plate with a little paper towel and set them aside.

Now it’s time for the meat.  Are you ready?  Take a look at your wok first to assess the state of your oil.  It must be piping hot and plentiful.  Cooking the eggs may have reduced your supply, so go ahead and add some more if you think that your wok has less than 1/2 cup left.  Don’t be shy with the oil, you are cooking Chinese!  Trust me, no matter how much you add, they are adding more in China.  You really can’t overdo it.  Just make sure it is HOT.  Depending on your stove, you may need to set it on high.

Once you are ready, drop your marinated pork into the wok.  Right after adding the pork, take advantage of the slightly cooled oil by adding your chopped garlic, ginger, and hot peppers.  Continue tossing the pork until it has cooked.  Now, add 2 tablespoons of Chinese Cooking Wine followed by the Mushrooms and Lilies.  Cook these for a couple of minutes, stirring and tossing all the time.  Next, add the Scrambled Egg.  As you continue to stir, try to deliberately break up the egg.  Finally, add the chopped cucumber and continue to stir-fry just until the last ingredient has become hot.  Remove the mixture from the heat and serve it immediately along with your delicious, Goji Berry enhanced Rice.

Goji Sesame Rice

Sliced Pork & Wood Ear Mushrooms

2 Comments

Filed under Asian

Adventures in Cheese Making

The other day I posted some pictures of my gigantic handmade lasagna, and mentioned that the cheese encased within its bubbly layers was totally handmade.  I promised to drop the skinny on you, so here it is, the story of my big cheesy adventure.

MLC

Would you believe everything you need to make cheese is pictured above? For serious. That's all there is to it! Of course, if you get into some more serious kinds of cheese, you'll probably need more ingredients. But for Ricotta and a simple Paneer, these staples will do you. According to some rumors I've heard you may even be able to make Queso Fresco from these simple ingredients. (Be still my heart!) 

Ricotta Ingredients:

  • 1 gallon Whole Milk
  • 2 Cups Cream
  • 1 Teaspoon Salt
  • 6 teaspoons Lemon Juice

I got my Ricotta recipe and instructions from this very thorough article posted on the foodie blog, Eggs On Sunday.  Though the recipe originated on Epicurious, Eggs on Sunday provides some valuable insight and tips to make your Ricotta come out perfectly on the very first shot.  Eggs on Sunday opted to half the original recipe, but because I am totally nuts, I decided to double it.  The process is very simple: Gently heat the milk, salt, and cream to a simmer, carefully stirring the entire time to keep the milk from scalding. At simmer, add the lemon juice (all at once), give it one quick stir, then let it sit for one minute. Stir again, sit another minute, then stir and simmer for two more minutes.  Immediately drain the pot into a cheesecloth and colander and allow it to drain for an hour.  Once the curds have cooled you can squeeze some of the excess water out of the cheese cloth.  Boom! You have a batch of frash, handmade Ricotta, the creamiest, richest Ricotta you probably have ever tasted. This stuff would make INCREDIBLE canolis.

MLC-1

Here is a shot of my Ricotta. This is roughly half of the cheese I made. The other half I reserved for making Paneer.

Paneer begins where the Ricotta enters the colander to drain.  After the cheese entered the colander, I carefully spooned out the portion I was using for my Ricotta and drained it seperately.  I allowed my Paneer curds to cool slightly, then began squeezing out the moisture through the cheescloth. Squeeze, squeeze squeeze.  This was sort of messy, so I suggest doing this over the sink.   After I was done squeezing, I wrapped my cheese intoa bundle, and squicshed it onto a dish, making it about 1 inch thick.  I topped the bundle with another dish, and weighed it down with a giant can of tomatos.  This helps to squeeze out the last of the water.  I let the cheese drain for about an hour, then removed the cheese cloth.  Neato completo, my cheese was finished.

MLC-4 

While my Paneer came out pretty well, there are a couple of things I will do differently next time.  Firstly,
I plan to have two colanders and two cheesecloths on hand to drain the
pot of cheese.  This will make separating the two portions of cheese
easier.  Instead of spooning away, I'll simply pour half into each
colander.  Second, I plan on salting the curds after they enter the
colander. The cheese was rich and creamy, but a little bland for
Paneer. I am also playing with the idea of spicing the curds.  You can
check out the original recipe for Paneer posted by Emma on The Kitchn.  Check out the comments, as there are some great tips avaialble.

2 Comments

Filed under Cheese

The Mother of All Lasagnas

MLC-5
 
Behold. Lasagna! But not just ANY lasagna. Oh no. You're looking at a a lasagna made from (by my estimation) about 75% handmade materials. I made the sauce AND the ricotta from scratch, browned up some turkey meat simmered in the homemade sauce, and used store bought lasagna noodles and mozzarella. I am so looking forward to biting into this monster, but I am patiently letting it set while I wait for Scott Bobleo to get home.

He'd better hurry, because this thing is calling my name.
MLC-6

P.S. More on the cheese making tomorrow!

1 Comment

Filed under Pasta